Who doesn’t love soft pretzels? Cover them with salt and dip them in cheese and you’ve got yourself a meal. Or brush on some butter, cinnamon and sugar and call it dessert. The possibilities are endless. I’ve recently perfected my homemade soft pretzel recipe, and I’m excited to share it with you.
To start with, I should tell you that I don’t cook well. A lot of my food ends up in the trash (actually, for many years most of my food ended up in the trash and my husband and I would just go get takeout somewhere.) Now I’m not telling you this so you’ll skip the recipe, I only mention it so that you will all know how easy these pretzels really are. Believe me, if I can make these things, anybody can.
[A Note to Bread Beginners – This pretzel dough is a yeast dough, which means you’re going to have to let it rise. The trick to getting your dough to rise is temperature and fresh yeast. If your yeast is more than 3 months old, and your dough won’t rise, get fresh yeast. Also, yeast likes it warm. I rise my dough in the greenhouse, which sits at about 90-100° F, if that gives you an idea of the temperature to shoot for.]
Anyway here we go:
The Cast Of Homemade Soft Pretzels
Yeast Starter
1 ¼ c warm water (Beginners, you are shooting for right around 110°, give or take)
1 tsp sugar
4 tsp active dry yeast
Dissolve the yeast and sugar in the warm water and leave it alone until foamy/creamy (5-10 minutes)
Meanwhile…..
Dough Ingredients
5 c flour (I use organic bread flour and can notice a difference…. However, I am also being influenced by the immensely hippyish climate around me so take whatever I say while a grain of (organic) salt. Probably, white, bleached, non-organic flour will make equally awesome pretzels, but you didn’t hear that from me.)
1/4 c sugar
1 1/2 tsp salt
Directions For Homemade Soft Pretzels
1. Mix all of those dry ingredients together and then make a well in the center; into which you’ll pour your yeast mixture and 1 TBSP vegetable oil.
2. Mix it all together until you get a nice, round dough ball. (I usually have to add more water to get a ball of dough and not a mess of moist flour, just add it slowly, like maybe 1 tsp at a time.)
3. At this point, they say that you should knead your dough before you set it to rise. However, I am lazy and I think kneading unrisen dough sucks, so I don’t follow the conventional recommendations and wait to knead it until after it has risen. If you decide to knead it first, do so for about 10 minutes. Either way, cover your dough ball with a thin layer of oil/butter, then cover that with a clean, moist cloth (I use a damp paper towel and then cover that with cheese cloth, but I also set my dough OUTSIDE in the greenhouse to rise so it takes some extra care) and set your dough in a warm place until it doubles in size. In the greenhouse this takes about 1 hour, on the window sill, which is cooler, it takes about 2.5 hours.
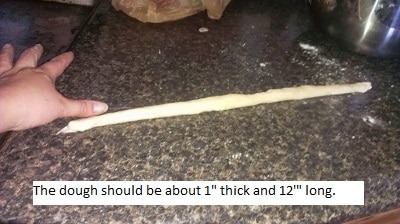
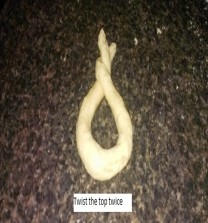
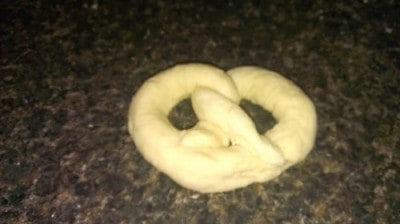
4. Once your dough has doubled, preheat your oven to 450 ° F, and dump the dough out onto a clean surface. If you haven’t already kneaded it, flour the surface first and then knead that dough baby! (Seriously, set your timer and do this for a good ten minutes, you won’t regret it). If you kneaded your dough before you let it rise (and this is why pretzel connoisseurs and Germans everywhere knead it first), it’s better to set your dough on an Un-floured, Un-oiled surface because it’s easier to roll it out and pretzel it. Either way, once you’re ready to pretzel (I turned that word into a verb just for you guys), separate your dough ball into 12 equal sections, then roll each section into a long snake ( you know what I mean right?) To pretzel your snakes (which should be about 12-14’ long), form the dough into a “U”, twist the top of the U twice, and then fold it over. I’ve included some pictures here to help describe what I’m trying to say.
5. Now comes the fun part. Did you know that the main difference between pretzels and just weirdly twisted dough is a quick dip in an alkaline solution? Me neither until just recently. In Germany, they used to dip their pretzel dough in lye before baking, but I tend to think of lye as belonging to the rat poison family so I don’t use it. Instead, take 4 cups of almost (but not quite) boiling water and dissolve 1 – 1.5c of baking soda into it. Quickly dip each pretzel into the baking soda solution and then set it on a greased cookie sheet. Then cover that sucker in good stuff like coarse salt, cinnamon and sugar, or whatever else floats your boat. Put your recently dunked and covered pretzels into the oven at 450° F for about 8 minutes, turning your pan halfway through, until they turn a pretty golden brown. (By the way, the baking soda dunk is what turns your pretzels brown and gives them a hard crust – if you skip that step, or don’t do it RIGHT before you stick your pretzels in the oven, then you’ll end up with salted white bread… still yummy but less “pretzely.” ) If everything works as it is intended to, you’ll end up with some gorgeous pretzels for your whole family to enjoy. Or, you could hide all of the pretzels in the linen closet and eat them all yourself…. we won’t judge you.
About The Author Of Homemade Soft Pretzels
Amanda blogs over at Late Nights and Little People where you can follow along as she navigates the perilous waters of having three young children, a husband who is away 6 months out of the year, and the craziest in-laws on the planet.


31 COMMENTS
Jerri
12 years agoHow many pretzels does the recipe make?
Jerri
12 years agojust re-read the recipe…sorry!
Jerri
12 years agoWe made this recipe into individual pretzel bites instead of pretzels – our 7 yr old son eats bite-sized snacks better – we brushed with butter and sprinkled w/kosher salt…he and my hubby LOVED them… thank you!
Brandy
12 years agoJerri-
I am so happy to hear you all loved them and had success with them. It’s way past my bedtime right now and all I can think of is making pretzels. Have a great week!
Ashley Christensen
13 years agoYour recipe is being featured tonight on Dandelion Wishes Wednesday! Come on by and grab a featured button 🙂
Brandy
13 years agoAshley-
Thank you so much for letting me know! I will head over and check it out.
Susan
13 years agoMy family loves soft pretzels. I’m gonna have to give this a try soon. Thanks for sharing at Inspire Us Thursday.
April @ The 21st Century Housewife
13 years agoThere’s nothing like a fresh homemade pretzel – my favourite are the salted ones. Thank you for sharing this delicious recipe with the Hearth and Soul hop. I’ve pinned it to our H&S recipes board.
Miz Helen
13 years agoThank you so much for sharing with Full Plate Thursday. Hope you are having a great weekend and come back soon!
Miz Helen
The Provision Room
13 years agoMmmmmm……..love homemade pretzels!!!!
Parrish (Life With The Crust Cut Off)
13 years agoThis looks awesome!!! We would love it if you would link up at our linky party:
http://www.lifewiththecrustcutoff.com/two-girls-and-a-party-linky-party-21/
Live every Wednesday to Sunday.
Hosted by:
http://www.lifewiththecrustcutoff.com/ Parrish @ Life with the Crust Cut Off
http://thissillygirlslife.com/ Dana @ This Silly Girl’s Life
We hope to see you there!
Barbara
13 years agoVery clear, easy to understand tutorial. thanks for all the beginner tips. Being a Philly girl, I don’t eat my pretzels warm. I put them in a paper bag, let them sit until they’re soggy & then eat. YUM! just like getting them from a street vendor.
Jenn
13 years agoMy daughters and I love soft pretzels! We will have to give this recipe a try. They look delicious! Thanks for sharing this recipe.
emily
13 years agoyum! Those look great. I love homemade pretzels! I’ve got a photobook giveaway ending Monday night… have you entered?? Three winners! http://www.nap-timecreations.com/2013/06/tasteful-tuesdays-611-smilebooks.html Emily @ Nap-Time Creations
Rebecca
13 years agoYum! Those look amazing. I love dipping soft pretzels in nacho cheese. I will have to try making these.
Brandy
13 years agoHow did I forget about dipping them in Nacho Cheese! I want to make a batch of them right now!
Chelsea
13 years agoWow! These look amazing!
Stacey Orendach
13 years agoI can’t wait to try this recipe!! Thank you! Soft Pretzels are my favorite 🙂
JADE OF Diva Fabulosa
13 years agoI love pretzels!!! I will ask hubby to make this during the weekend! Yum!!
Suburban Style Challenge
13 years agoThese look delish and super easy to make! I love warm, soft pretzels and will have to give this a try sometime!
Jodi @ A Mom Having Fun
13 years agoThose look so good. Soft warm, fresh pretzels are so good!
Shary
13 years agoI was actually just thinking of making these! You’re amazing. I’m so stoked to find they are dairy free, too!
mel
13 years agoWe eat soft pretzels here all the time. Oh so yummy!
SHELLEY R ZUREK
13 years agoG+ and Tweeted ya. I adore fresh pretzels but am too lazy to take the time to make them!
Dede
13 years agoMy kids and husband LOVE soft pretzels. Thanks for the recipe and great pictures!
Ashley Sears
13 years agoI am so pinning this soft pretzel recipe to my “things I want to cook” board on Pinterest!
Amber Edwards
13 years agoWe are planning on doing more baking together as a family this summer vacation with the kids. They would love to make pretzels! I have to give this a try!
Sandy a la Mode
13 years agoohh i do LOVE a warm pretzel! not sure the last time i had one!!
xo,
Sandy
Sandy a la Mode
Jenna Wood
13 years agoWe love soft pretzels, but don’t like how the frozen ones can get so stiff and hard a few minutes after microwaving. We’ll have to give this recipe a shot!
Erica
13 years agoOne of my favorite things as a kid was getting a pretzel in the mall with my dad. These look much healthier, though!